Showing posts with label 3D projects. Show all posts

Wednesday, June 4, 2014

Celebrate 30!! Holiday Happiness Collection

Who knew?  

That it was Close to my Heart's,  founder and CEO, Jeanette Lynton’s 30-year anniversary
in the stamping & scrapbooking industry.

Or that they would be celebrating with six awesome collections.  Each only $30 (with qualifying order)

And that I would be topping this offer up by creating SIX projects (each one showcasing a different collection)

And that I would share these instructions with you for FREE when you purchase these collections.
(the nitty gritty on how the FREE instruction offer works, purchase one collection, get one set of instructions, purchase 2 collections, get 2 set of instructions, and so on. Must be purchased online through the June FREE workshop Orders) Once your order has been placed please use the contact box on the side to indicate which workshop instruction you would like.)

So,This is what's in the Holliday Happiness Collection.

Holiday Happiness Collection
Season’s Tweetings Gift Bags (2 sets), Frosted Paper Packet, Frosted Complements, Frosted Assortment, Sparkle & Shine Textiles, Sparkle Holiday Shapes, Sparkle & Shine Complements, Sparkle & Shine Assortment
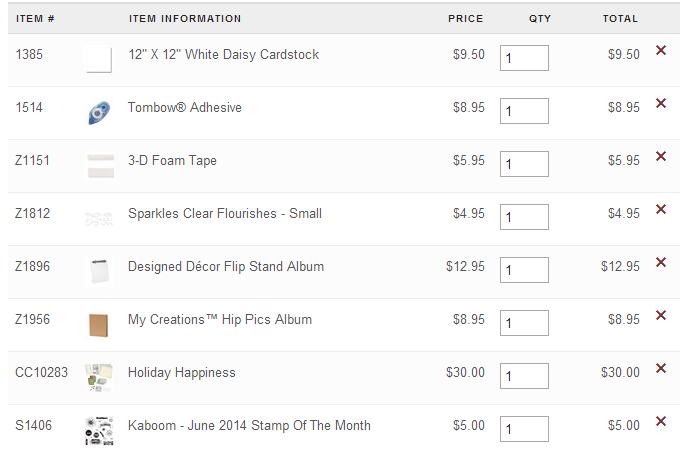
And this is my suggested qualifying $50 order.  

Cost of this order $86.25 (plus GST & S&H)
Actual Value of this order $133.75 

seems like a pretty good deal to me.

And, here's a sneak peak at the project I am creating to showcase this collection
So, go ahead, place your order
the instructions for this little mini will be available June 10th, 2014
items you will need in addition to the Holiday Happiness Collection--
juniper cardstock, ruby cardstock, white daisy cardstock,
bitty sparkles, 3-D foam tape, juniper washi tape,
Artiste Cricut Cartridge
and your favorite adhesive.  


Thanks for stopping by. Please leave a comment. I love to hear what you think.
CTMH Consultants can get the instructions for all six workshops by making a minimum $20 purchase off of my OBA and by sending me a note with your consultant #.   Instructions will be emailed to you as I create them.  The first one will be available June 10.

Friday, October 12, 2012

Star light, star bright

Ever have an idea in your head and then POW!
You look at someone else's website and they have put it all together for you.
Well that's what happened when I saw this

on Fancy Melissa's blog 
click on her link to find out how she made it and check back in a couple of days and I will show you my take on her star.
Thanks Melissa.


I use Close to my Heart products in 99% of my creations. Like what you see and want to re-create it....Click on my shopping site (in the sidebar) to order your supplies

Sunday, September 9, 2012

Clue #9--the reveal

Drum roll please...... if you are at CTMH Regionals in Edmonton,
 you've should have had time to see this.
If not, here it is....
Tell me if your guess was any where close.


This is a 3D Christmas Centerpiece Album---constructed completely from "Close to my Heart" products.
(well, except for the empty peanut can)
Instructions for this project will be available in the near future.

Some of the items you will need to complete this project
X7162B      Pear & Partridge Paper Pack
1385           White Daisy Cardstock
1272           Cranberry Cardstock
1273           Dessert Sand Cardstock
Z2419         Cranberry Marker
Z1790         CTMH exclusive Art Philosophy Cricut Cartridge---this is a must have
                    and once you have it you will wonder how you did without it---over 700 images
Z1789       Chalkboard Adhesive Sheet
Z1732       Color Ready Seam binding
Z679         Liquid Glass---another must
Z1313       Stardust Glitz Glitter
Z1482       Silver Glitz Glitter
D1494       Christmas Cheer Stamp set
Z1360      Designer Rhinestone Brads
Z1151     3D foam tape--another must have
and one empty peanut can---or if you are allergic to peanuts---any other "paper" can approximately 4" in diameter and 3"--4" tall will do.
Oh...and lots of adhesive
--the liquid glass works well for those items that really have to stick together or that red tacky tape
--tombow adhesive (1514) is my choice for most everything else.

Now, I think that's about all you will need to re-create this project.
Click here to order off my OBA and have your supplies shipped directly to you.
 
As a thank you gift for ordering off my OBA ( minimum $50 order--Canadian citizens only)
 I will email you the instructions for this project
Note for those outside of Canada I am working on a " ready to assemble kit that you will be able to order directly off my blog & pay with Paypal.  Details should be finalized by the end of Sept.

99% of all my creations use Close to my Heart products. Like what you see and want to re-create it....Click on my shopping site (in the sidebar) to order your supplies

Saturday, May 5, 2012

project life pt#4

After I made my "life box"

and cut all the pocket inserts
I thought...I wish I had some dividers
     or file folders to keep things organized inside my little box
so, this is how I made some


 One for blank journaling inserts
and use one to put your pictures & completed journaling inserts in
until you are ready to transfer them to your "life book"
 As you can see,
I need to develop some pictures
and work on my journaling
I keep my "life box" by my chair
and in the evening, when I am relaxing,
I can grab a journaling card
and jot down some of the memories from the day.
Then I can stick my journal card back in the box
 until I have time to put it in my "life book"
hmmmm.....this might actually work

Friday, May 4, 2012

project life--pt#3


So, in part 1, I showed you how to create your basic inserts
for your life book.
Today, I'm going to help you do some math.
Z1348  Album                               $15.95
4113    Vertical  Pocket pages       $ 8.95
Z1322  My Creations Photo Box  $ 6.95  
you choice Stickease                     $ 4.95
X5901 Colonial White Cardstock $ 2.95
subtotal                                         $39.75
dotty for you promo paper            $ 5.00
                                                     $44.75

So, for under $50.00
you get everything below, enough stuff to do at least 12 weeks of "life" pages 

 Now you can dig into your stash of stamps & pretty up the Journaling Cards
or you can just add a sticker to them, or leave them plain.
The choice is yours.

I do have to confess
that I did pull 1 piece of Cocoa Cardstock out from my stash to make the "life box"
and I added one 12x12 page protector (you can mix & match with this book) for my first page.

Here's a few pic's of my first pages


These are without my pictures
...and....

These are the pages with pictures.
And it all started with this
If you would like to order these supplies to start your own
life book
One more thing,
I made 72 page inserts out of 1/2 a dotty paper pack
and 24 journaling jots (I just made this term up) out of 4 sheets of Cardstock
I used up some of the rest of the dotty paper pack
on the life box, and the cover page,
but I still have lots left.

Sunday, February 5, 2012

BBQ in a Box


From bbq in a box

Finally,
I found out what I want to do with these
"My Creations Memory Game" boxes.
I have had one sitting on my shelf, staring at me...
asking me...
What am I good for?
And finally, I know.
BBQ in a Box

From bbq in a box

These are the "base" pieces for covering the box


From bbq in a box

Trace the curve of the lid of the box onto the 3x5 1/2" piece
Cut

From bbq in a box

Trace the inside curve of the box onto the 3x3" piece
cut

From bbq in a box

wrap the 12 x 2 1/2" piece around the box
as shown
then adhere the 3x3 piece on to the front
(sorry I forgot to take a picture)

From bbq in a box

this is for the top of the box
dragonfly stamp--D1093--retired
doodle alphabet--D1242--retired
You could use any alphabet set
the white piece was random stamped with the dragonfly from the
Pemberly Workshop on the Go (G1033)

From bbq in a box

And this is how I put it all together before I attached it to the top of the box.

From bbq in a box

And the top of the box

I then glued the "in a" and "box" pieces
to the front of the flap


From bbq in a box

I wrapped a piece of
Sweet leaf stiched grosgrain (Z1383)
around the box..I didn't want a big knot so
I tied it with a piece of waxy flax
(as shown)

From bbq in a box

I then pulled the two ends of the waxy flax through the flower
(as shown)
and secured it with a button

From bbq in a box

front of the box


From bbq in a box


From bbq in a box

tip..use 3 columns when printing out the recipes
      they will fit nicely onto the chipboard squares
I am going to color co-ordinate my recipes
the lagoon ones will be sauces
green for veggies
pink for beverages, etc.

From bbq in a box

the nice thing about the box is it becomes it's own holder.
I think I am going to make a few of these for gifts.


Monday, January 23, 2012

Rock the Block Promotion workshop pt 2 (the final piece of the puzzle)

From January 22, 2012

I know, I know,
it looks like a quilter's square
and it is. But it is a beautiful tool to use
when make a photo cube

From January 22, 2012
Simply place the quilter's square over your photo
adjust the 2" lines so you
are NOT dissecting someone's face (it's fine to cut off an ear or two, but it spoils the whole picture if someone's face is split in half)
From January 22, 2012
And voila,
my children.
From January 22, 2012
Another view of the blocks as I have them displayed.

Sunday, January 8, 2012

How to cover our "card" box pt 2


From January 6, 2012

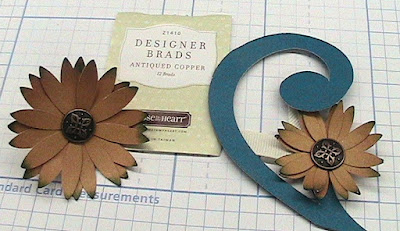
Using the Close to my Heart "Art Philosophy" (AP for short) cartridge cut out
8 of  #4 flower --p. 28 @ 1 3/4"
3 of  #4 flower--p. 28 @ 2 1/4"
ink the tips and curl the edges

From January 6, 2012

Flower asembly
I used 3 of each flower (same size)
layered them like above.
I used a brad as the flower's center and to hold them all together
I also used a bit of ribbon (folded and attached behind the flowers) to act as leaves

From January 6, 2012

to make the "bud"
I used 1 flower
put some liquid glass on the inside of the petals
and pinched them together

From January 6, 2012

I then cut out a couple of flourishes
and adhered the flowers to the flourishes

From January 6, 2012

I added a bit of ribbon and a copper embellishment to finish it off
Hope you liked it
(oh, I decided not to use the "bud", but kept the instructions in,
 just in case you wanted to try one)

Saturday, January 7, 2012

How to cover our "card" box


From January 5, 2012

I used the Dreamin' Paper to cover this box
First gather your supplies
Z1647   My Creations Card Box
X7142B Dreamin

Z2192 Pacifica ink
Z726 Sponge Daubers
your choice of adhesive
Need to order some, click here


From January 5, 2012

I inked all the edges. 
Depending on the paper you choose and the look you want
this step is optional

From January 5, 2012

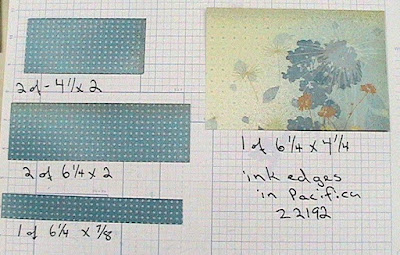
Next step is to cut the paper for the outside of the box
2 of  4 1/4"  x 2" for the short sides of the box
2 of  6 1/4" x 2" for the long sides of the box
1 of 6 1/4" x 7/8" for the closure flap
1 of 6/1/4" x 4 1/4 for the top of the box
then ink the edges of the paper in pacifia

From January 5, 2012

cut the following for the inside of the box
2 of 4 1/4" x 2" for the short sides of the box

2 of 6 1/4" x 2" for the long sides of the box
1 of 6 1/4" x 7/8" for the closure flap
2 of 6/1/4" x 4 1/4 for the inside of the  top of the box
            and one for the inside of the bottom of the box
then ink the edges of the paper in pacifia
ahere to the box and Volia!!
Course now that you have the basic box covered you can embellish it.
Be creative
add some ribbon
some 3D flowers

whatever you like or leave it plain.
I'm going to leave mine for a bit
until my creative juices start flowing again.


Friday, January 6, 2012

Rock the Block Promotion workshop pt 3

I know...I'm skipping ahead to part 3 of this project...
don't fret,
I'm just waiting on a few supplies to come in

so this is how to decorate the lovely little box your blocks can live in when you are not displaying them


From January 5, 2012


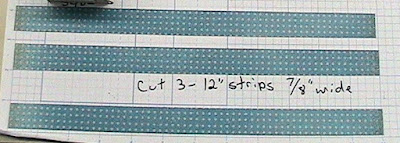
cut 3 strips 7/8" x 12" (you will only need about 1/2 of the last strip)


From January 5, 2012

cut a square 6 1/4"
test it to make sure it fits inside the bottom of the box
adhere.

From January 5, 2012

then start adhering the 7/8" wide strips to the outside of the box

From January 5, 2012

Overlap the strips where they join
I used mod podge overtop the joins
continue till all four side are covered.

From January 5, 2012

I then wrapped the box in ribbon to give it a finished look