Showing posts with label christmas cards. Show all posts

Saturday, November 10, 2018

Tis the Season, CTMH Blog Hop

Love these hops, if you've never been on one, here is how it works...(if you know, just skip this paragraph)  
1st--- read my post, or skim it and just look at the pictures 
then at the end of the post there will be link to the next blog in the hop.  Click on this link (name) and you hop over to the next blog and get to see what someone else created using the same paper, or layout or whatever the criteria is for that particular hop.  There is usually a master list on someone's hop (and this will be noted in my post near the end) so if you get lost or a link is broken, you can check out the master list and pick up where you left off.   A simple and easy way to find ideas for your next project.

This hop travels across Canada from Coast to Coast and features Close to my Heart Consultants featuring Close to my Heart products.  So if you like what you see and want to recreate it, visit my website  or your local Close to my Heart Consultant.

If you just came from  Brandi's you  are on the right track.  

This month we are featuring Tis the Season 
paper pack by Close to my Heart
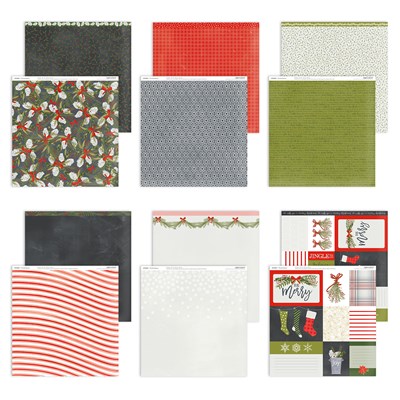
product image
I created this quick and easy card
then I flipped the papers over and created the one below

And to show you just how versatile this layout is 
I created this one below using CTMH's Just for Fun paper

All 3 cards used the same stamp set and the
 and the same cutting pattern (below)
Hope you've been inspired.
Now hop on over to Kristine's 


Friday, October 26, 2012

baby, it's cold outside

I love this card.
It's made with a retired set--bundled buddies and  snow flurries
Just goes to show you that our stamp sets, never go out of style


I use Close to my Heart products in 99% of my creations. Like what you see and want to re-create it....Click on my shopping site (in the sidebar) to order your supplies

Wednesday, September 26, 2012

Chirstmas Cheer--stamp set


This is one of my favorite stamp sets.
I used it to make my 3D Christmas Centerpiece album and I am using it again on this card

I used the CTMH Art Philosophy Cartridge to cut out the "shapes"
....soooo easy, just set the dial to your size & quantity and walk away.

  Like what you see and want to re-create it....Click on my shopping site (in the sidebar) to order your supplies

Thursday, December 29, 2011

card a day-19 & 20


From Dec 2, 2011


From Dec 12a, 2011

So, this challenge didn't go as well as planned...took me a bit longer
than the 20 days to do the 20 cards...sorry.
Life sometimes gets in the way of the best laid plans, and this was one of those time.
However, 2011 is almost at the end.
I wonder what I have in-store for you for 2012.
Okay, I know and I will let you know before the end of 2011
Bye for now.

Monday, December 19, 2011

card a day-18

card a day-16 & cricut #12


From Dec 12a, 2011

Okay, I know I am cheating combining two challenges into one post, but I'm way behind as it is
 and Christmas is almost here
and I want to share my Studio J files
and I'm all out of excuses.

Monday, December 12, 2011

12 days of Cricut--7


From Dec 12a, 2011

Close of of Cricut snowflake

From Dec 12a, 2011

The Card!!
I love the way a little detail can make your card WOW.
Hope you like this one, it's one of my favorites.

card a day --13


From Dec 12a, 2011

I used a retired CTMH stamp set for this card

From Dec 12a, 2011

Stamp images on white cardstock
and mat as shown

From Dec 12a, 2011

I know I say this every time, but
It is very important to remove the protective film from both sides of the card before you adhere anything.
Adhere the 5 1/2 strip to the inside (outside edge) of the card as shown.
(Note if you dont want the adhesive to show, adhere the mat to the back of the card and then adhere the patterned paper on the inside)

From Dec 12a, 2011

adhere the sentiment to the inside of the card as shown

From Dec 12a, 2011

Final Step
Close card, adhere image to front of card.
(center it over the mat on the inside)

From Dec 12a, 2011

View of the card open.
I appologize for the poor picture quality, but my editing software was giving me grief, so I quit fighting with it and just posted the pic as is.

Saturday, December 10, 2011

card a day --12


From Dec 10 a, 2011

This is another clear card, that I have previously posted,
but now I am sharing the instructions with you
These are the pieces you will need.
Note: I have used a retired Close to my Heart stamp set and paper pack.

From Dec 10 a, 2011

Stamp your images on the white card stock and mat as shown
Leave one 2 1/2 x 1 1/2 white piece blank

From Dec 10 a, 2011


VERY< VERY Important...remove protective film from both sides of your clear card
Then
Adhere the 4 1/4 rectangle to inside of card (about 1/2 inch from inside edge)

From Dec 10 a, 2011

Close card
Center stamped & matted image over 4 1/4 rectangle
Adhere to front of card as shown

From Dec 10 a, 2011

Open card.
 Adhere second retangle (with sentiment stamped on it) 3/4" from the top and flush with the outside edge.
As shown.

From Dec 10 a, 2011

Close card.
Center snowflake stamped image over sentiment (so you can't see it)
Adhere to front of the card.

From Dec 10 a, 2011

Add some Bitty Sparkles to the snowflakes.

From Dec 10 a, 2011

Open card
Adhere blank white cardstock to the inside of the front of the card
(This will give you a place to write your own personal message)
Voila!!

From Dec 10 a, 2011


12 days of Cricut--6


From Dec 10, 2011


I used the same recipe for this card as I did in the Card Challenge #11
However, I used the
Elemental paper X7141B
Snow Flurries  D1384
and cut the snowflake #1 (p.23) @ 2" and 1 1/2"
I also added some sparkles to it

Sunday, December 4, 2011

12 days of cricut-4


From Dec 2, 2011

For this card I used the Shift/decorative Layer key on page 55 for the patterned red,
the decorative layer for the cocoa and the "rectangle 7" for the colonial white.


From Dec 2, 2011

Here's a close up of the layers.

Saturday, December 3, 2011

12 days of Cricut--3


From Dec 2, 2011


In this photo/christmas card.
 I used the cricut snowflake shape to add a touch of whimsy to the card.
 I also stamped a flourish on the background and added a bit of bling.