 |
| From January 5, 2012 |
I used the Dreamin' Paper to cover this box
First gather your supplies
Z1647 My Creations Card Box
X7142B Dreamin
Z2192 Pacifica ink
Z726 Sponge Daubers
your choice of adhesive
Need to order some, click here
 |
| From January 5, 2012 |
I inked all the edges.
Depending on the paper you choose and the look you want
this step is optional
 |
| From January 5, 2012 |
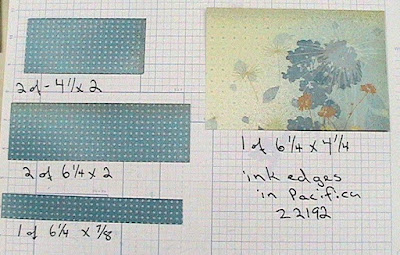
Next step is to cut the paper for the outside of the box
2 of 4 1/4" x 2" for the short sides of the box
2 of 6 1/4" x 2" for the long sides of the box
1 of 6 1/4" x 7/8" for the closure flap
1 of 6/1/4" x 4 1/4 for the top of the box
then ink the edges of the paper in pacifia
 |
| From January 5, 2012 |
cut the following for the inside of the box
2 of 4 1/4" x 2" for the short sides of the box
2 of 6 1/4" x 2" for the long sides of the box
1 of 6 1/4" x 7/8" for the closure flap
2 of 6/1/4" x 4 1/4 for the inside of the top of the box
and one for the inside of the bottom of the box
then ink the edges of the paper in pacifia
ahere to the box and Volia!!
Course now that you have the basic box covered you can embellish it.
Be creative
add some ribbon
some 3D flowers
whatever you like or leave it plain.
I'm going to leave mine for a bit
until my creative juices start flowing again.
No comments:
Post a Comment
Thank you so much for your comment,
If you would like to order any of these products,
please click on my shopping link at the side.
Thanks, again
Terry Ann