If you're going to make a cupcake, you probably need some baking soda (or at least the container)
In hindsight I would have put the foam tape up over the ridged area,
I used one layer of foam tape at the bottom and two at the top.
This gave your cupcake some "flair"
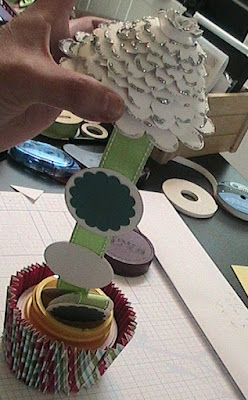
to make the cupcake holder I borrowed Tresa Black's idea, and refined it to work for me.
I cut 3 12" x 2 1/2" strips, scored every 1/4 inch (for the first inch or so) and then folded the strips back and forth. You don't have to score the whole strip. It just makes it easier to make the folds even.
Glue the three pieces together to form a circle.
turn the baking powder tin upside down and press accordian folded circle into foam tape.
You can then run a bead of hot glue or liquid glass arround the bottom the secure it better
This is what it will look like from the top
Time to make the frosting
cut about 12 flower #5 from your AP cartridge
I made one at 2, 2-1/4, 2-1/2", 2-3/4,and so on until I reached 3 1/2
and then rolled the edges over a pen to curl them down.
Then I started layering them like so
I used a double layer of foam tape between each layer
I then cut one more flower at 4 1/2 inches (I made it so it would sit over the edges of the cupcake)
I then cut a flower (font on page 70) to put on top
Time to Glitz it up
AND NOW FOR THE ALBUM
I cut these circles at 2" so they would fit inside the baking powder tin (try one, before youcut a bunch)
make as many circles as you want in your album.
Leave about 3/4 between circles so the album will fold down into the container nicely
On the end that will be glued down inside the container I left about 3inches between it and the first "photo" circle (this is so you can see your first photo) and on between the last two circles I left about an inch and a half. I then glued the last circle to the bottom of the "frosting"
Then all you have to do is lift the frosting....
And when it's closed
I would like to thank Mary Crosby for starting me on this creative journey and Tresa Black for her inspiration. I hope you like this.
p.s. in hindsight, I think an empty Pringles container would work as well.
and I may take the next day off.
 |
| From October 30, 2011 |
 |
| From October 30, 2011 |
In hindsight I would have put the foam tape up over the ridged area,
I used one layer of foam tape at the bottom and two at the top.
This gave your cupcake some "flair"
 |
| From October 30, 2011 |
to make the cupcake holder I borrowed Tresa Black's idea, and refined it to work for me.
I cut 3 12" x 2 1/2" strips, scored every 1/4 inch (for the first inch or so) and then folded the strips back and forth. You don't have to score the whole strip. It just makes it easier to make the folds even.
 |
| From October 30, 2011 |
Glue the three pieces together to form a circle.
 |
| From October 30, 2011 |
turn the baking powder tin upside down and press accordian folded circle into foam tape.
You can then run a bead of hot glue or liquid glass arround the bottom the secure it better
 |
| From October 30, 2011 |
This is what it will look like from the top
Time to make the frosting
cut about 12 flower #5 from your AP cartridge
I made one at 2, 2-1/4, 2-1/2", 2-3/4,and so on until I reached 3 1/2
and then rolled the edges over a pen to curl them down.
 |
| From October 30, 2011 |
Then I started layering them like so
I used a double layer of foam tape between each layer
 |
| From October 30, 2011 |
 |
| From October 30, 2011 |
I then cut one more flower at 4 1/2 inches (I made it so it would sit over the edges of the cupcake)
 |
| From October 30, 2011 |
I then cut a flower (font on page 70) to put on top
 |
| From October 30, 2011 |
Time to Glitz it up
 |
| From October 30, 2011 |
AND NOW FOR THE ALBUM
 |
| From October 30, 2011 |
I cut these circles at 2" so they would fit inside the baking powder tin (try one, before youcut a bunch)
make as many circles as you want in your album.
Leave about 3/4 between circles so the album will fold down into the container nicely
 |
| From October 30, 2011 |
On the end that will be glued down inside the container I left about 3inches between it and the first "photo" circle (this is so you can see your first photo) and on between the last two circles I left about an inch and a half. I then glued the last circle to the bottom of the "frosting"
Then all you have to do is lift the frosting....
 |
| From October 30, 2011 |
 |
| From October 30, 2011 |
 |
| From October 30, 2011 |
 |
| From October 30, 2011 |
 |
| From October 30, 2011 |
And when it's closed
I would like to thank Mary Crosby for starting me on this creative journey and Tresa Black for her inspiration. I hope you like this.
p.s. in hindsight, I think an empty Pringles container would work as well.
and I may take the next day off.
Very,very cute,Terry.
ReplyDelete